Credit origination – A lot of evolution on the horizon
5 June 2020
While consumer credits are becoming more automated and user-friendly to originate (for customers via online channels or for bank employees) all other credits are often still very manual and labor intensive to originate.
This blog tries to give a description of the different steps in an origination process and how they can be innovated.
We will describe the features in the sequence of a typical credit origination, i.e. from simulation up to contracting. Before however diving into the subject, it is important to remind that a good origination process should also comply with several general (non-functional) requirements, which should be inherently baked into the process:
- One single access point for each user (i.e. a central cockpit / portal for all employers)
- Facilitate a multi-channel experience, which means:
- The credit can be originated in a consistent way (i.e. reusing same APIs) across all channels
- A credit demand (or even simulation) can be stored and taken over in another channel, i.e. adhere to the principle of cross-channel continuation
- Continuous availability (24/7) of the origination process
- Continuous tracking of a credit file, i.e.
- All automated and manual actions are fully audited
- Time spent in every step of the process is measured (and an estimation of the expected time the next steps will take is provided)
- The current status of the credit, the credit history and an overview of the remaining steps to complete the credit origination can be easily retrieved
- Notify all stakeholders of progress and delays (compared to estimated timelines) – cfr. blog on notification manager (https://bankloch.blogspot.com/2020/03/notification-management-dont.html)
When looking at the origination flow, it is important to make a distinction between standardized credit products (i.e. products for which most demands can be handled through STP) and tailor-made products, for which a lot of manual interventions of employees of the bank are required. Most retail credit products fall under the standardized products, while most corporate credits fall under the tailor-made category. In this blog, we will combine both products in 1 flow, but it’s clear that certain steps are less relevant (or even irrelevant) for one or the other category.
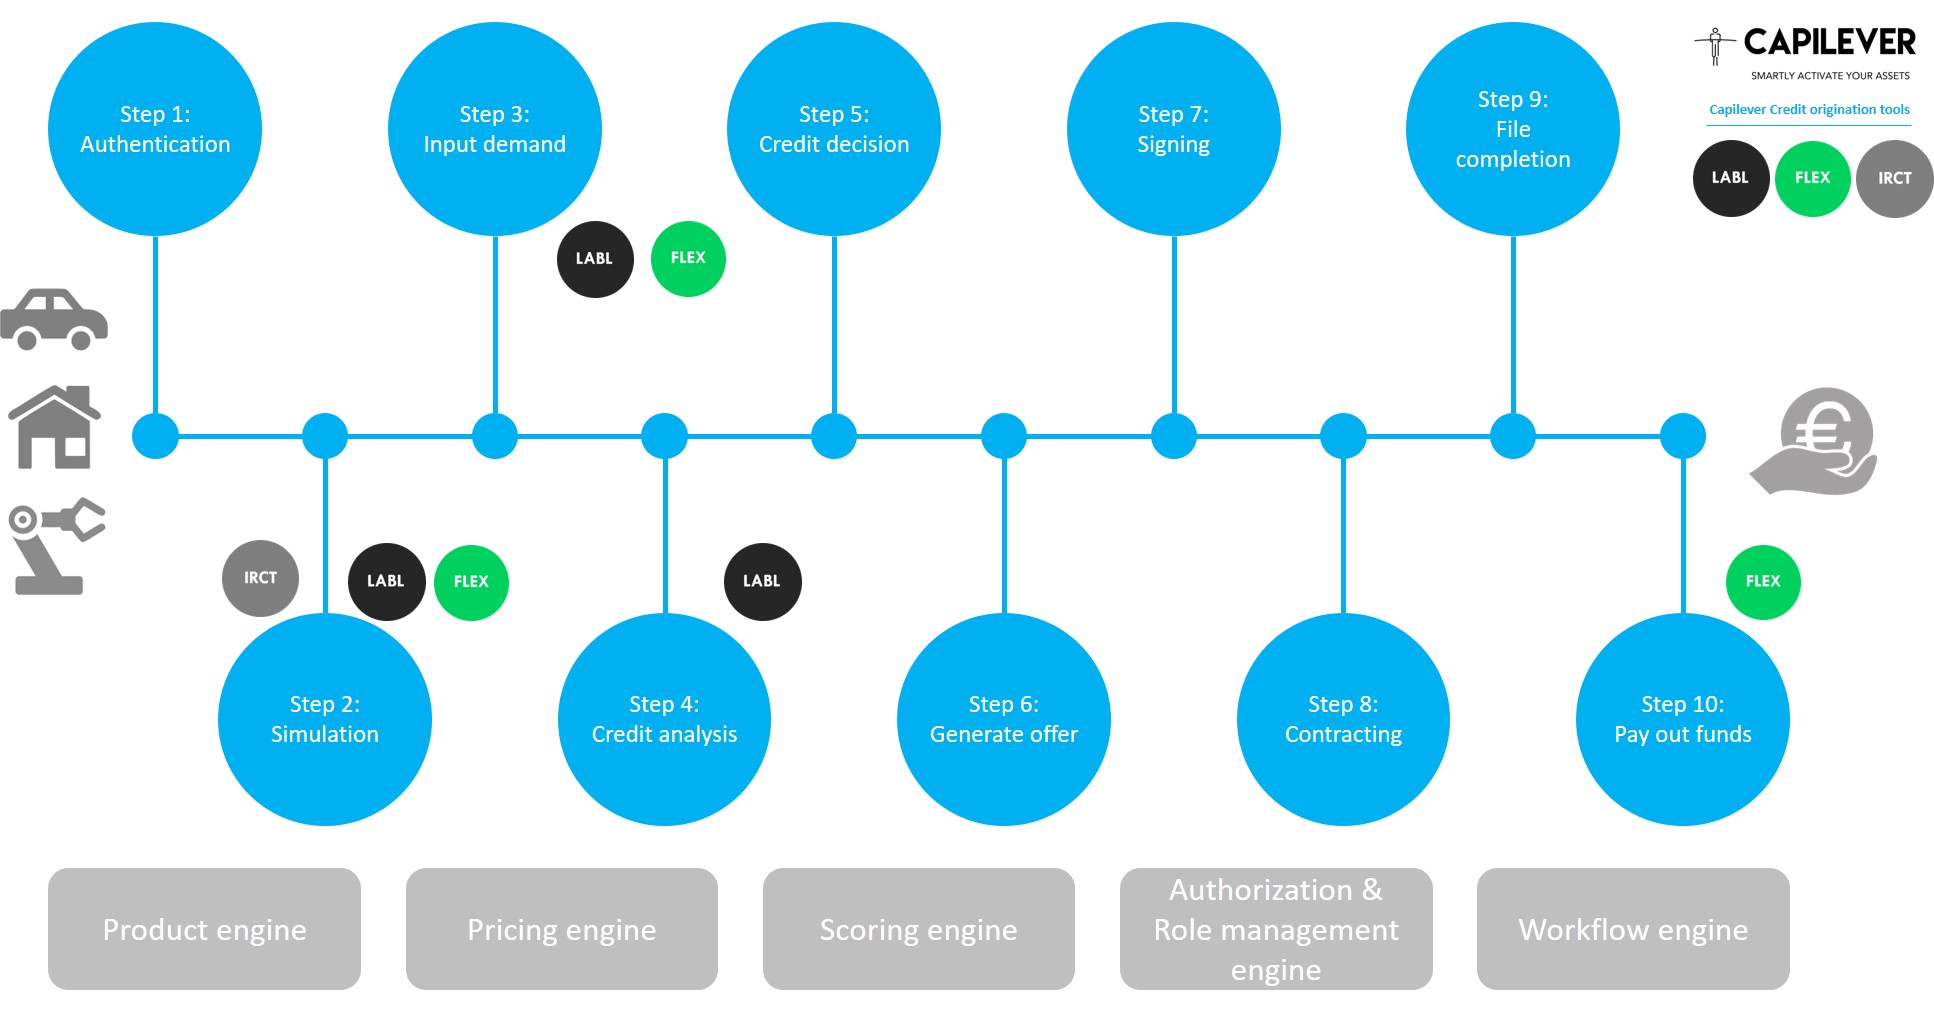
Step 1: Authenticate the customer
If the user is a customer of the bank, this is easy. At that moment, the customer can login via the standard authentication mechanisms of the bank to access the online banking (or in case the customer passes via a bank employee the employee can just select an existing customer).
If the user indicates he is not a customer of the bank, it becomes more difficult. The bank can choose to work anonymous for the first steps, but this means that certain services like pre-filling (e.g. based on previous demands), saving a simulation/demand (for later continuation), personalized pricing, but also fraud detection (e.g. excessive simulation can be an indication of possible fraud) are becoming very difficult or even impossible.
Ideally a quick authentication of the user is therefore required, but the friction created by the additional effort and the fact that many users want to do a simulation anonymously should be properly taken into account.
For authenticating a non-customer, a less bank-specific identification method like eID, Itsme, Google authenticator, Facebook/LinkedIn… can be used. The compromise between a frictionless experience, security, guaranteed identity and additional info that can be obtained for pre-filling should always be carefully chosen.
Notice also that if a user indicates he is not a customer of the bank, this cannot be trusted (e.g. user might have forgotten he has a sleeping account at the bank). A proper matching with the customer database is therefore still required, to avoid customer duplication, but also to ensure credit demand is not by accident linked to the wrong customer.
The proper authentication of a non-customer will also be important for KYC/Customer onboarding of the user, if he ultimately submits his credit demand.
Step 2: Simulation
The first important step for a user is to simulate their credit. There is however no such thing as the simulator. It is important however to work customer-centric, i.e. not start from a credit product, but start from the customer’s needs, i.e. what is the project the customer wants to accomplish. Starting from the customer’s project allows to guide the customer in the best possible way towards the best possible credit, but also gives opportunities for cross-selling other products (like e.g. insurances or other banking products).
For example when a customer plans to renovate their home, the customer might automatically opt for a renovation consumer credit. A wizard accompanying the user might show that a Lombard credit (backed by the customer’s securities portfolio – see Capilever’s LABL solution – https://www.capilever.com/labl/) or a readmission of their existing mortgage credit might be the better (cheaper or more flexible) choice.
This guided simulation consists of multiple steps, which can be skipped by the user (in case he already knows the answer to that step), i.e.
*Step 1: Calculate the project, i.e. calculate the exact costs for establishing the project. For corporate credits, this step can also allow the customer to setup a business case of the project (i.e. not only assessing what the project costs, but also what are the expected financial gains of the project or in other words calculating the ROI/EVA of the project). This info can also be important for the assessment of the credit, as a positive business case reduces of course the risk for the bank to grant the credit.
*Step 2: Calculate the financing needs, i.e. based on the available assets (which the user wants to use for their project) and calculated project cost, the financing needs can be determined. This step also allows to calculate, show and explain a ratio like LTV (Loan to Value), which will play an important role in the pricing and scoring of the credit.
*Step 3: Calculate the customer’s maximum reimbursement capacity, i.e. based on the customer’s income and expenses (cash flows), calculate how much the customer can maximum reimburse. This also allows to calculate, show and explain a financial ratio like the DTI (Debt to Income).
*Step 4: Identify collaterals which will be used for the credit and help to assess the value of these collaterals. This can help to improve scoring and pricing of the credit.
*Step 5: Simulate different credit products (it could even be possible to consider proposing a combination of credit products in 1 packaged deal to finance the project). Based on the determined project (aim of the credit), financing needs and maximum reimbursement capacity, the simulator can already narrow down considerably the different credit formulas which can be presented to the customer, but still the user should be able to compare different credit products (consumer credit, mortgage credit, Lombard credit…), different durations and different interest (e.g. fixed versus variable) and reimbursement (e.g. monthly reimbursement, balloon, bullet…) conditions. For this, a good simulation tool is needed in which the user can provide their forecast (pre-defined scenario or a custom) of the future central bank interest rate and/or inflation evolution in order to make a deliberate choice (cfr. Capilever’s IRCT tool – https://www.capilever.com/irct/).
In all steps, a maximum pre-filling can be obtained, based on previous simulations/demands and other info available at the bank, e.g. insight in the cash flows on the customer’s current account or insights in the total wealth of the customer (see Capilever’s NLPT solution – https://www.capilever.com/nlpt/).
Usability is also key for these simulations, i.e. assist the customer via slider bars, visual representations, wizards, contextual help…
Note that the simulation step will make use of engines, like a product engine and pricing engine, which will be described separately in this article (as they are also called in a few other steps in the origination process).
Step 3: Introducing the demand
Once the user has chosen their desired credit product(s) from the results of the simulation tool, the demand process can be initiated. In this process the customer will have to provide information required to properly analyse and decide the credit demand.
Depending on a private or professional credit, the data requested can be quite different, but globally you can identify following blocks:
- General information about the borrower(s), i.e.
- For a private credit this includes all personal details of the borrower(s), such as name, address, contact details, nationality, civil status, identity card information, National Register number, birth date, family situation…
- For a professional credit, this includes all info about the company, such as name, juridical form, sector, address, inception date, …, but also information about the owners and/or board members of the company (or at least of 1 representative demanding the credit)
- Professional information about the borrower(s), i.e.
- For a private credit this includes all information about the profession of the borrower(s), like professional status (employee, independent, unemployed, retired…), date as of which current professional status, type of contract, regime, employer name, employer address, employer sector, date as of which working for current employer…
- For a professional credit, this will mainly include some additional info on the source of revenues of the company
- Cash flows, i.e. detailed description of the income and expenses of the borrower(s):
- For a private credit, this includes all info on income, like salary, rental income, child benefit… and all info on recurring expenses, like rent and credit reimbursements.
- For a professional credit, this includes typically all info present in an annual report of a company, allowing the bank to calculate all financial ratios. It will often also include both historical financial figures and forecasts for the future.
- More info about the objective of the credit. Both for a private and professional credit, this section will request additional info about the project being financed, like the total project cost, a detailed description of the project… The higher the amount of the credit, the more info about the project needs to be delivered. While for a small consumer credit, this can be limited to just the type of object being bought, for large corporate credits, this can be a file of dozens of pages describing the project (incl. its risk and business case) in detail.
As the input of this demand data is very time consuming, it results in a lot of friction. It is therefore important to guide the customer as much as possible via:
- Dynamic hiding and showing of fields based on previous answers
- Maximum pre-filling of demand, based on previous demands, already provided proof documents, PSD2 account data retrieval, social media integrations, external data sources…
- Maximum completion of info, e.g. address of employer (based on employer name), place based on postal code…
- Wizards and contextual help
- Possibility to chat (or call) with someone of the bank in case of questions (bank employee should be able to see already provided answers)
- Check accuracy and completeness as quickly as possible and clearly show any issues in the demand details
The provided demand data also needs to be justified by proof documents, e.g. proof of ID (e.g. copy of identity card), proof of address (e.g. via copy of invoice of utilities company), proof of employment and income (e.g. via salary slip), proof that person requesting the credit is allowed to request the credit (e.g. marriage contract, statutes of company…)…
For the proof documents, a choice has to be made to provide the proof documents at the start of the demand process or at the end of the demand process. Asking the documents at the start allows a higher pre-filling but can scare and confuse the user.
Step 4: Credit analysis
Once the demand is submitted, the credit analysis process (i.e. screening process) can be started. We can identify multiple different steps in this stage:
- Enrich the demand with data from other sources. Multiple sources can be used to enrich the demand, e.g.
- Call to National Bank to retrieve info about pending credits at other credit institutions and any issues with repayments of other credits
- Retrieve external scoring such as the FICO score
- Enrich with financial data (e.g. balance and historical transactions) from the bank itself, but also from other banks (e.g. via PSD2)
- Enrich with public sources, like government records
- Enrich with social media data, such as Google, Facebook, LinkedIn…
- Enrich with private data sources, like Bureau van Dijk, Graydon, D&B, ICC, Refinitiv, ICC…
- Enrich with recent accounting data from accounting consolidation platforms, like Silverfin
- Calculate risk and financial ratios from the provided financial figures, such as AVI, DTI, LTV, Gross margin, Operating Margin, Profit Margin, ROE, ROA, ROC, Current ratio, P/E ratio…
- Validate if the provided proof documents are complete, authentic (no fraud committed) and consistent with the provided demand data. In case of missing or incorrect documents a process can be started to get additional and/or adapted proof documents. This validation process can be manual or automated via advanced OCR-techniques.
- Execute the scoring. For standardized credits this can be fully automated, while for certain tailor-made credits, this can be manual and result in an analysis report, which contains a detailed description of the executed assessment. The automated scoring engines become more and more sophisticated, taking more and more parameters into account and evolving from simple rule-based engines to complex AI-based platforms.
In this step (even for standardized credits) a lot of manual interventions are required. A workflow engine will manage the correct routing of all manual tasks, so that each demand can be screened in the most efficient way possible.
Step 5: Credit decision
Based on the results on the credit analysis step a credit decision can be taken. The workflow engine used also in the previous step will also orchestrate the credit decision process.
A credit decision will usually result in 3 outcomes, i.e. the credit is accepted, refused or further actions are required. This decision can be taken automatically in case of a standardized loan or manually in case of a tailor-made credit. In case of a manual decision a risk portrait of the customer and their demand should show the decision taker the most relevant information from the credit analysis step in order to take the best-informed decision in the least possible time.
In case the decision is that further actions are required, this can have several meanings:
- Additional data is required from the customer to complete the analysis
- Additional proof is required to justify certain figures
- Inconsistencies in data (or between the data and proof documents) have been identified requiring further justification
- The loan can only be granted if certain conditions are adapted, such as a lower amount, change in duration, higher pricing, additional collaterals…
The workflow engine should orchestrate this back-and-forth between the customer providing/correcting demand data and proof documents, the credit analyst analysing the demand and the decision taker taking a decision.
Step 6: Offer generation
Once the credit has been approved, an offer can be provided to the customer. This is an official document from the bank, giving an approval for the loan (under the provided conditions) and setting the loan conditions. Often the offer is also generated before the proof documents need to be provided and validated. In that case the offer will have additional conditions that the offer is only valid if the demand data is justified by the necessary proof documents.
The offer is usually only valid during a short period, allowing the customer to reflect on the credit and potentially compare with other banks. While the simulation has no binding character for the bank, the bank usually commits to the conditions set in the offer during the period in which the offer is valid.
Based on the offer, a negotiation of the conditions can also happen. Typically, a negotiation on the applied interest rate is required. A separate approval workflow for price derogations should also exist in the bank to support the acceptance of discounts granted during the negotiation process.
In some cases, the customer can also ask an extension of the validity of an offer for a number of days.
Step 7: Signing
Once there is an agreement on a proposed offer, the offer can be confirmed and signed by the customer. This can be done manually, but also handled via a digital signature. Typically, there will be two signing steps, i.e. a step to sign the offer and a step to sign the contract occurring later in the process. The techniques and flow of these 2 signing steps are however very similar (only a different object that is signed).
In order to properly support this step, the bank should support digital signing, identifying of the required signers (especially for a corporate credit), multi-signature (i.e. digital signing of multiple borrowers), different signing methods (like Itsme, eID, bank DigiPass…)… For more info on this step, check out blog “Digital signature – There is no such thing as THE digital signature” (https://bankloch.blogspot.com/2020/02/digital-signature-there-is-no-such.html)
Step 8: Contracting
Once the offer has been signed and all necessary info has been properly validated (e.g. check if proposed good does not have already a mortgage on it) the contract can be generated. Again, this contract can be generated fully automatically, semi-automatically or fully manually. In case of a fully automatic generated contract, the document will be generated from a set of pre-defined paragraphs and a number of pre-defined rules and cannot be modified anymore.
A semi-automatic generated contract will also be generated by a document generator, but allows a bank employee to change, add or remove certain paragraphs. The document generation tool should allow to set rules on which paragraphs can be changed or removed and all adaptations should be fully traceable.
A fully manual contract is fully written in a text-editor tool, like e.g. Microsoft Word.
Once the contract is generated, it can also be signed in same way as the offer is signed. In case the contract is signed by a non-client, the bank should also onboard (potentially execute KYC) the customer.
Step 9: File completion
Once the contract is signed, any additional info or documents to adhere to the contractual agreements should be collected. Furthermore, it is possible that the customer is entitled to certain government subsidies (e.g. eco-subsidies for private persons or subsidies for companies), in which case the bank should also provide all details to the authority in order to obtain the necessary subsidies as soon as possible.
In this step, the collaterals will also be established, often via the involvement of a notary (preferably via a digital communication via eNotary platform). In some cases, it might also be required to first appraise a collateral by a pricing expert.
Step 10: Pay out of the funds
Once the full file is completed and signed, the pay-out can happen. This pay-out can be in one-shot, but can also happen in several blocks, for which each time also proof documents need to be provided (e.g. in case of a mortgage loan for a newly constructed building, for which planned payments to the contractor need to happen).
All these steps are supported by several transversal engines, which are called during different steps in the process:
Engine 1: Pricing engine
The pricing engine allows to configure a differentiated pricing model of the bank, based on different criteria (risk-based pricing, relationship-based pricing…), like customer risk, credit risk (e.g. based on LTV or DTI), credit amount, credit duration, requesting channel, type of credit, type of object bought with the credit, geographical location of branch where the credit is sold, underlying collaterals…
Based on the configured model, the engine should be able to calculate a price and provide it to the credit origination tool.
The pricing engine should also support discount management, so that discounts compared to the calculated price can be offered. The engine should manage the calculation of the maximum discount level (based on profitability of customer and credit), the introduction and approval of a discount (making use of the authorization engine) and the follow-up of a discount.
Engine 2: Authorization/Role management engine
This engine needs to manage the authorization levels and escalation paths for employees in the bank managing credit origination requests.
The engine should expose following requests:
- Retrieve the required authorization model for a specific demand (e.g. 4-eyes/6-eyes…) depending on different criteria of the demand. The demand can be a credit analysis request, a credit decision request, a pricing derogation request…
- Get the authorization levels of a specific employee of the bank, i.e. what is the maximum amount/percentage the employee can authorize, which decisions can the employee take…
- Get escalation path, i.e. if employee has insufficient authorization for a specific demand to which employee should be escalated
Engine 3: Workflow engine (with real-time BAM)
The workflow engine will manage the dispatching of manual (or semi-automated) tasks to the right person (or group of persons), but also determine the right process orchestration (of manual, semi-automated or automated steps) depending on the type of demand.
The workflow engine allows a flexible configuration of the process flows, meaning that workflows can be easily adapted in real-time.
For all this, the workflow engine should take following aspects into account:
- Demand prioritization, i.e. prioritize tasks correctly, avoiding that complex demands are systematically prioritized over others and block the progress of simple demands
- Skill-based and availability-based routing (workload distribution) of tasks, e.g. assign complex tasks automatically to experts, automatically reassign tasks to back-ups in case of illness or overloaded inbox…
- Automatically generate checklists for employees, adapted to the context of the demand
- Real time business activity monitoring, allowing to continuously monitor certain KPIs, so that alerts can be generated to management in case of issues (e.g. when business volume has increased in such a way that there are insufficient employees to manage the workload in line with the SLAs).
Very few banks have a credit origination system that meets these criteria. Banks have already made good progress in increasing the STP level of simple credit products, like consumer credits, but for more complex products there are still a lot of efficiency gains to be found. Reviewing the bank’s credit origination architecture towards a holistic credit origination (and not a product-by-product siloed application architecture) can not only make the IT landscape simpler, cheaper and more agile, but can also significantly increase revenues for the bank (due to faster credit through-put times) and reduce costs, by a more optimal use of the credit specialists at the bank.